Synopsis: Upon receiving a set of TLDs, you will need to pair them together if your work zone requires multiple units to control the flow of traffic.
- Level: Easy
- Time required: 1-2 minutes
- Additional equipment required: None
- Extra information: Maximum distance between lights - 1 mile/1.5km in radio communication, no limit in GPS communication
Related Articles: How to program a T-Junction signal plan on your TLDs (Radio)
Section 1 - Unit Mode Selection
Go to your traffic light and choose Master. Press the arrow to continue

Figure 1 - Unit mode selection
Section 2 - Intersection Name
Name your intersection (optional)

Figure 2 - Intersection name
Section 3 - Traffic Pattern Selection
Select the type of traffic pattern you will need
Single light: Approach/access is controlled by a single TLD unit
Shuttle: The section controlled by the TLD has one lane for both directions. Traffic flow in one direction is halted while opposing traffic borrows the use of the lane
Two-way: Both approaching and opposing traffic on a 2-way road can be halted in order to safely allow non-traffic activities in the zone controlled by the traffic signals (minimum 2 signal heads).
T-Junction: A junction where three 2-way road segments meet (could also be a Y-junction).
Crossroads: A junction where two (or more) 2-way road segments meet and cross.
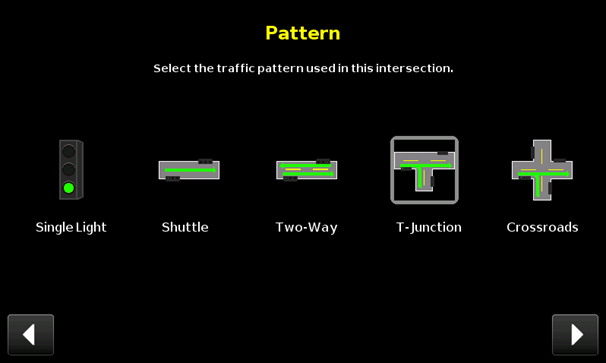
Figure 3 - Pattern selection
Section 4 - Driving Side
Select the driving side

Figure 4 - Driving side
Section 5 - Radio Frequency
Select the radio frequency

Figure 5 - Radio frequency
Section 6 - Default Mode
Select the default mode

Figure 6 - Default mode
Section 7 - Start-up Mode
Select the start-up mode

Figure 7 - Start-up mode
Section 8 - Final Pairing
Pair your units by hitting ‘’scan’’
8.1. If your unit is the Master, you will be in Zone 1
8.2. Select the unit discovered in the scan list, then press Zone 2 to assign it there.
8.3. Select the other unit in the list, press Zone 3, and assign it there.
8.4. Each zone should have 1 unit in it (see figure 8)
8.5. Press the arrow to finish pairing the units, they will then reboot
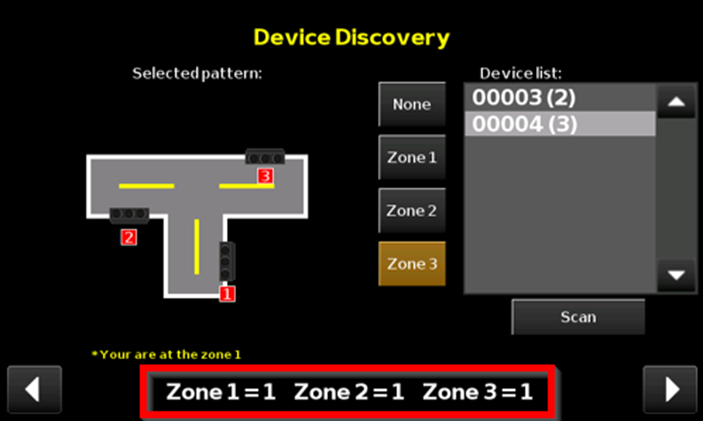
Figure 8 - Zone selection
Note: Once the units have rebooted and are paired together, you will be able to program a signal plan.
If you require any additional help, contact our toll-free number at 1-888-488-7446 or email us at support@ver-mac.com
Comments
0 comments
Please sign in to leave a comment.